
The $1,000,000 Amazon Auto-Campaign
What if everything you’ve been told about Amazon Auto-Campaigns is wrong? The conventional wisdom says they’re just for keyword research—a simple tool to harvest search terms before moving on to the “real” work of manual campaigns. But what if this approach is leaving millions of dollars on the table?
This case study from Prolific Zone breaks down exactly how we turned a single, often-underestimated Amazon Auto-Campaign into a sales-generating powerhouse, pulling in nearly $1,000,000 in sales with a stunning 10.78x Return on Ad Spend (RoAS) on its most profitable segment.
Forget what you know. This is the story of how trusting the algorithm, combined with a ruthless focus on clarity, created a nearly seven-figure sales engine. And we’re sharing the exact 3-step playbook so you can replicate this success.
The Shocking Results: A Snapshot of Success
Before we dive into the how, let’s look at the what. These are the top-line numbers from this single Amazon Auto-Campaign, proving that when optimized correctly, it can be your primary sales driver.
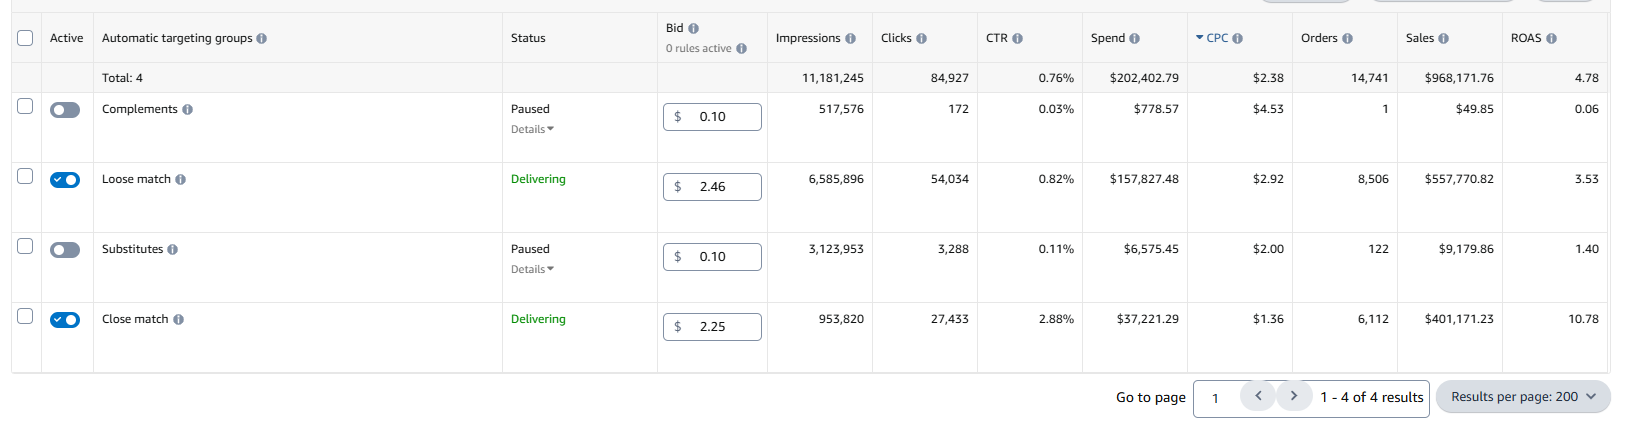
The raw performance data from the Amazon Advertising console, showing nearly $1M in sales from a single Auto-Campaign.
Here are the key performance indicators (KPIs) that tell the story:
| Metric | Value |
| Total Sales | $968,171.76 |
| Total Ad Spend | $202,402.79 |
| Total Orders | 14,741 |
| Overall RoAS | 4.78x |
| Close Match RoAS | 10.78x |
The most staggering number here is the 10.78x RoAS on Close Match targeting. For every dollar spent on this segment, the campaign generated $10.78 in return. This wasn’t just a profitable campaign; it was a money-printing machine.
The Contrarian Approach: Why We Ignored Conventional Wisdom
For years, the standard Amazon PPC strategy has been clear: use Auto-Campaigns as a temporary research tool. The process usually looks like this:
1.Launch an Auto-Campaign
2.Run it for a few weeks to gather customer search terms.
3.Identify high-performing keywords.
4.Move those keywords into a new, highly-controlled Manual Campaign.
5.Pause or kill the original Auto-Campaign.
This strategy is built on the assumption that Amazon’s algorithm isn’t smart enough to manage a budget effectively and that human control is always superior. We decided to challenge that assumption. What if we treated the algorithm not as a dumb robot, but as a powerful data-processing partner? What if, instead of giving it messy, keyword-stuffed data, we gave it a crystal-clear, minimalist instruction set?
This experiment was designed to answer one question: Can a perfectly optimized Auto-Campaign outperform a complex portfolio of Manual Campaigns? The answer, as the numbers show, is a resounding yes.
Data Deep Dive: Where the Real Money Was Made
To understand why this strategy was so successful, we need to break down the performance of the different match types within the Auto-Campaign. The magic is in the details.
RoAS Performance: The Power of Precision
The difference in performance between Close Match and Loose Match is the central story of this case study. While the overall campaign RoAS was a healthy 4.78x, the Close Match segment was operating on another level entirely.
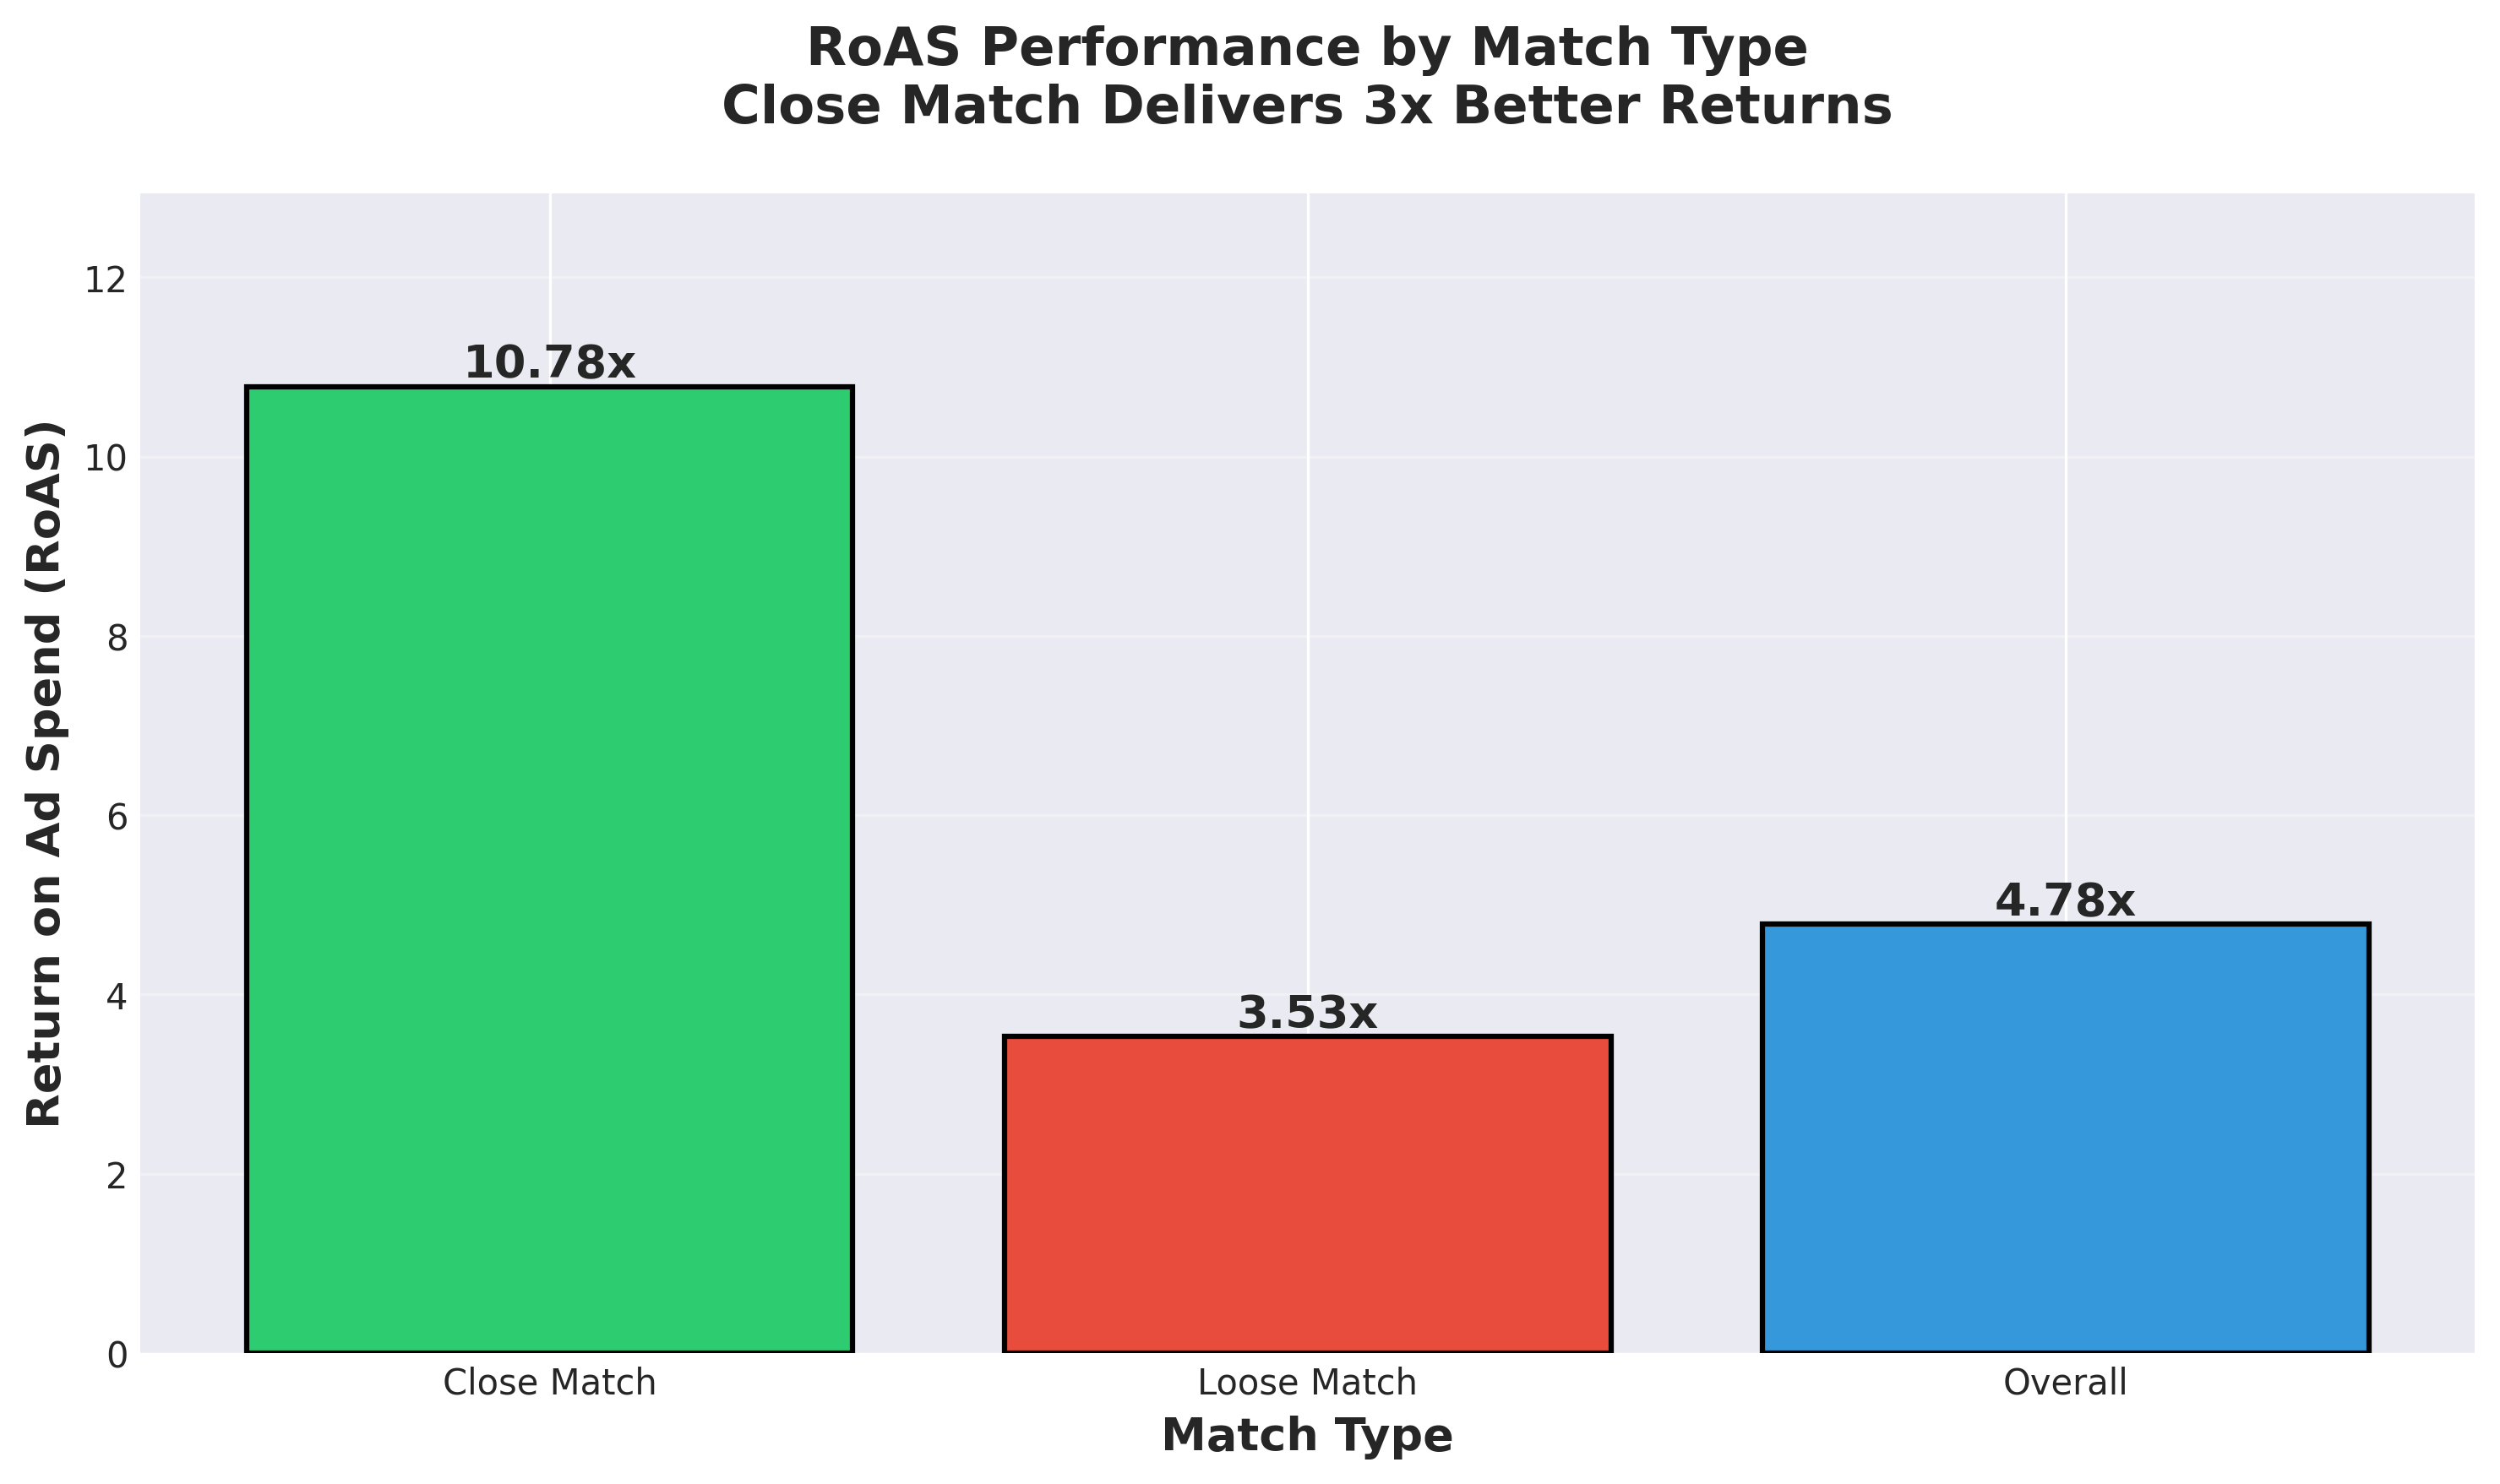
Close Match targeting delivered a 10.78x RoAS, more than three times the return of Loose Match targeting.
As the chart clearly shows, Close Match targeting was the undisputed champion, delivering returns that are almost unheard of at this scale. This tells us that when Amazon’s algorithm is highly confident that a search term is directly relevant to the product, the conversion potential is massive.
Click-Through Rate (CTR): Winning the First Battle
A high RoAS starts with a high Click-Through Rate (CTR). If customers aren’t clicking on your ad, they can’t buy your product. Here again, the data shows a dramatic difference between Close Match and Loose Match.
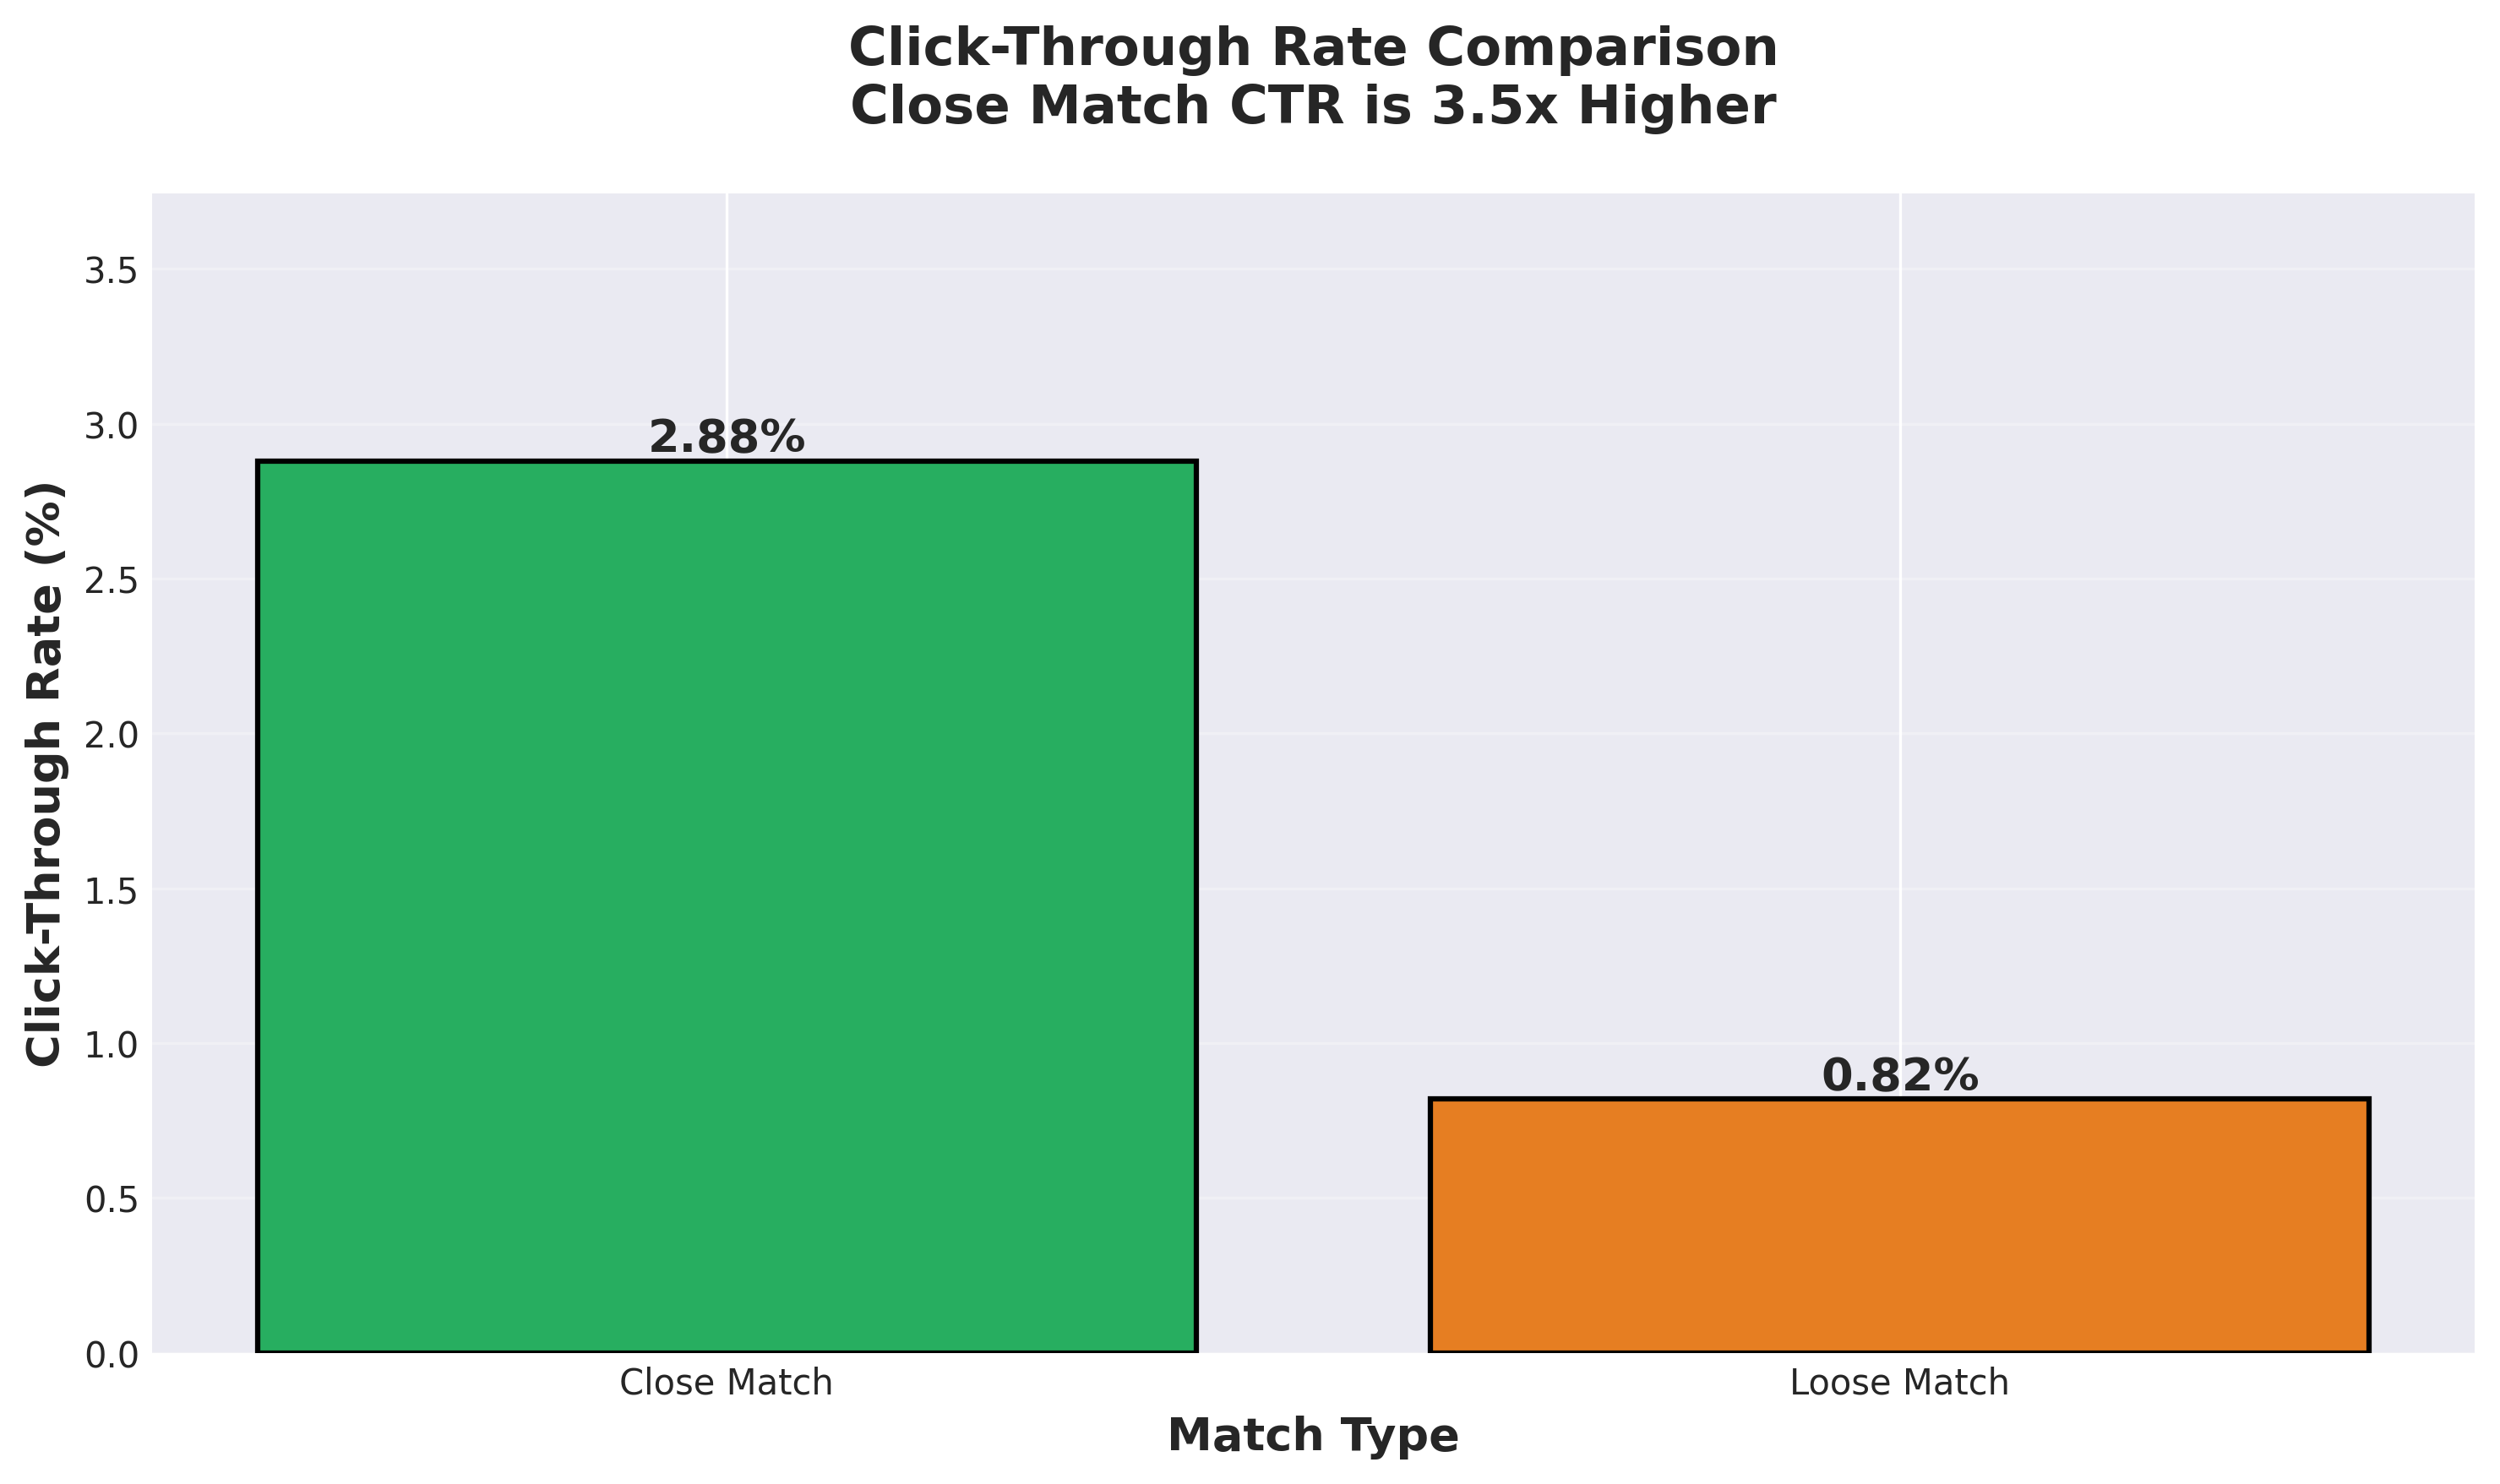
The CTR for Close Match was 2.88%, over 3.5 times higher than the 0.82% CTR for Loose Match.
This isn’t just a small variation; it’s a landslide. A 2.88% CTR on Amazon is exceptionally strong and indicates that the ad was being shown to a highly relevant audience that was actively searching for this type of product. The hyper-concise listing (more on that below) likely played a huge role here, as the ad copy and title would have been perfectly aligned with high-intent search queries.
Spend vs. Sales: A Story of Efficiency
Perhaps the most compelling visualization is the comparison of ad spend to sales generated for each match type. It perfectly illustrates the efficiency of Close Match targeting.
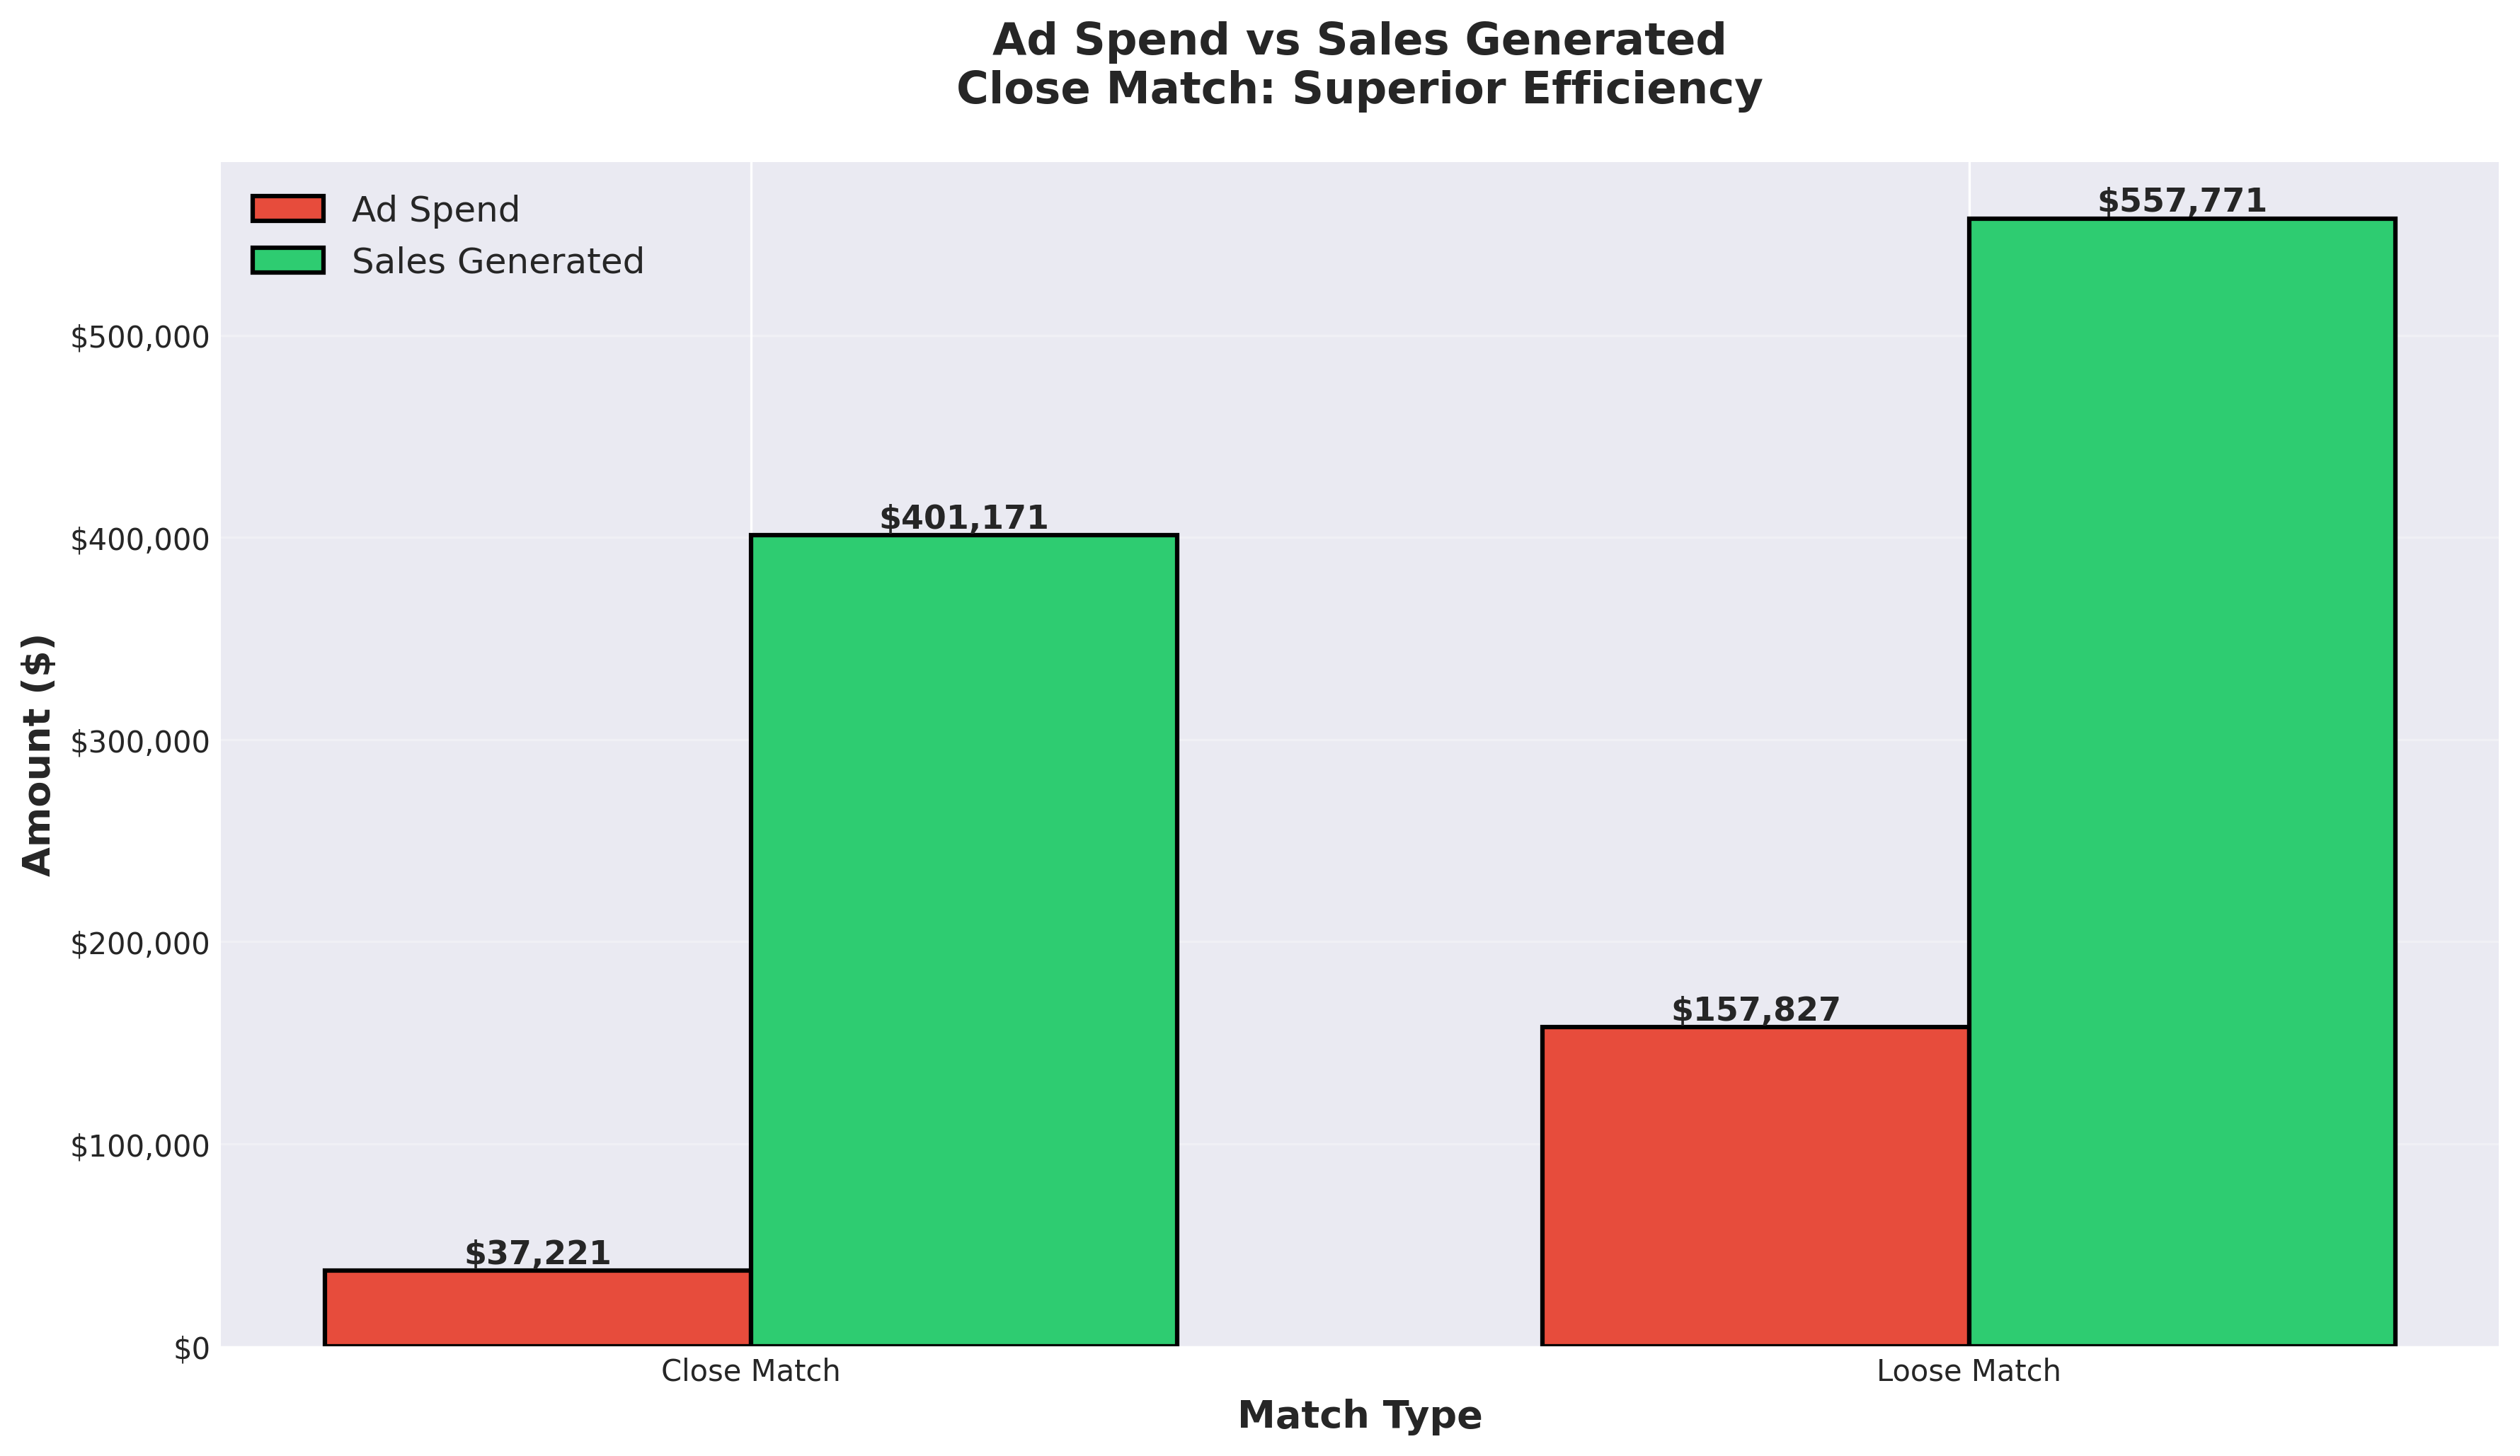
While Loose Match consumed the majority of the budget, Close Match generated a disproportionately high amount of sales relative to its spend.
Loose Match consumed over 75% of the ad spend ($157k) to generate $557k in sales. In contrast, Close Match used less than 20% of the budget ($37k) to generate over $400k in sales. This is the definition of working smarter, not harder. By focusing the algorithm, we enabled it to find the most efficient path to revenue.
The 3-Step Playbook for a $1M Auto-Campaign
This strategy isn’t based on a secret software or a complex bidding formula. It’s built on a foundation of simplicity, clarity, and a deep understanding of how Amazon’s algorithm thinks. Here is the exact 3-step playbook we used.
Step 1: Craft a Hyper-Concise Listing
The first and most critical step was to create a product listing that was ruthlessly efficient. We ignored the temptation to stuff our title and bullet points with every possible keyword. Instead, we focused on giving the algorithm a perfect, unambiguous signal.
•Title: We used only 60 characters, not the full 200 allowed. The title was direct, containing only the most critical keywords that defined the product.
•Bullet Points: We used only 5 bullet points, each under 100 characters. There was no fluff, no marketing jargon—just direct, benefit-driven information that a customer (and the algorithm) could understand in seconds.
Why this works: A long, keyword-stuffed listing can confuse the algorithm. It creates ambiguity about which terms are most important. A short, concise listing does the opposite. It provides a powerful, concentrated signal that tells Amazon: “This is exactly what this product is, and this is exactly who it’s for.” This clarity allows the algorithm to make much better decisions in the ad auction, especially for Close Match targeting.
Step 2: Implement Aggressive Negative Targeting
This is the step that most sellers neglect, and it’s arguably just as important as the first. An Auto-Campaign is only as good as the traffic it’s allowed to pursue. We knew that to maintain profitability, we had to prevent the campaign from wasting money on irrelevant searches.
We identified every possible search term that our product could be mistaken for and added them as negative exact match keywords. In total, we added 303 negative keywords.
How to execute this:
1.Brainstorm: Think of all the things your product isn’t. If you’re selling a leather dog collar, you might add negative keywords like “chain collar,” “cat collar,” or “vegan leather.”
2.Analyze Search Term Reports: Regularly pull your search term reports and look for irrelevant or low-performing queries that are costing you money. Add them to your negative keyword list immediately.
3.Be Ruthless: Don’t be afraid to cut out traffic that is only tangentially related to your product. The goal is to force the algorithm to focus its budget only on the highest-intent shoppers.
Step 3: Monitor, Learn, and Update
This is not a “set it and forget it” strategy. While the Auto-Campaign does the heavy lifting, ongoing monitoring is crucial for sustained success. The key is to continue feeding the algorithm good data.
•Monitor the Search Term Report: This is your most valuable source of data. On a weekly basis, review the report to identify new irrelevant terms that are wasting spend. Add them to your negative keyword list.
•Watch Your Metrics: Keep a close eye on your key metrics, especially RoAS and CPC (Cost-Per-Click). If you notice performance dipping, the first place to look is your search term report. It’s likely that a new, irrelevant search query has started consuming a significant portion of your budget.
•Trust the Process: Resist the urge to constantly tinker with bids or pause the campaign. As long as you are consistently refining your negative keyword list, you should trust the algorithm to optimize performance over time.
Geographic Considerations for USA & Canada Sellers
This strategy is universally applicable for sellers on the North American marketplace, but there are some geographic considerations to keep in mind, especially when it comes to monitoring your campaigns.
If your primary audience is in the United States and Canada, your customer base is spread across multiple timezones (from Pacific Time to Atlantic Time). When scheduling time to monitor your search term reports and update negative keywords, it’s often most effective to do so in the morning (e.g., 9 AM Eastern Time). This allows you to analyze the previous day’s complete data before the current day’s peak shopping hours begin across the continent.
By staying on top of your campaign hygiene weekly, you ensure that this powerful Auto-Campaign engine remains profitable and efficient, no matter where your customers are located.
Conclusion: A New Paradigm for Amazon Advertising
This case study proves that the humble Amazon Auto-Campaign can be so much more than a simple research tool. When given clear instructions and protected from irrelevant traffic, it can evolve into a sophisticated, self-optimizing sales engine that drives massive revenue with incredible efficiency.
The era of painstakingly managing hundreds of manual keywords is not over, but its dominance is now in question. By embracing a strategy of clarity, precision, and trust in the algorithm, you can unlock a new level of performance in your Amazon PPC efforts.
The key takeaways are simple:
1.Clarity is King: A concise, direct listing is your most powerful tool.
2.Defense Wins Championships: Aggressive negative targeting is non-negotiable.
3.Trust the Machine: Give the algorithm good data and let it do its job.
It’s time to rethink what’s possible. It’s time to give your Auto-Campaigns the respect—and the optimization—they deserve.
Frequently Asked Questions (FAQ)
Q: How long did it take to reach these numbers?
A: This case study reflects performance over a 12-month period, demonstrating the long-term sustainability of this strategy.
Q: What kind of product was this for?
A: While we cannot reveal the specific product, this strategy is most effective for products with clear, well-defined use cases and a specific target audience. It is less effective for broad, multi-purpose products.
Q: Did you pause the other match types (Substitutes and Complements)?
A: Yes. Early in the campaign, we noticed that the RoAS for Substitutes and Complements was extremely low (1.40x and 0.06x, respectively). We made the data-driven decision to pause them to prevent further wasted ad spend and force the budget into the high-performing Close Match and Loose Match segments.
Q: Can this strategy work for new products?
A: Absolutely. In fact, it can be an excellent way to launch a new product, as it allows you to quickly gather data on high-intent search terms while maintaining profitability. Just be prepared to monitor the search term report very closely in the initial weeks.
Q: What should my starting budget be for a campaign like this?
A: Your budget should be based on your product’s price, profit margin, and your overall advertising goals. You can start with a modest daily budget (e.g., $25-$50/day) and scale it up as you confirm profitability and gather more data.